News

Let’s discover the best kayaking Toronto spots, where urban and natural beauty are combined to create the most exciting kayaking experience. You will not only get to paddle in with the panoramic view of the city but also enjoy a diverse range of travel activities. Locations near the city offer calm waters, while the rivers boast secluded channels where adventures await, with wavy waters to sharpen your skills.
With our insights, you will discover stunning launch points, where to rent your kayak and how to make the best out of your paddling journey.
DISCLAIMER: Before traveling to a kayak location, ensure that the location still allows for kayaking and make yourself aware of any rules and regulations in place.
Why Toronto is a Great Place for Kayak Lovers?
Kayaking Toronto is a dream for many. There is something for everyone. Beginners can enjoy the slow-moving water of spots just a quick drive from downtown Toronto. Challenge-seekers can take on ocean waters or big lakes with choppy waves.

Source: Unsplash
With 43 kilometers of Lake Ontario’s waterfront and various access points to nearby rivers, bays and sheltered lagoons, it’s like the city never fails to surprise you with new stunning launch spots.
The average summer temperature ranges from 68°F to 77°F (20°C to 25°C), so swimming is an ideal activity besides kayaking. That’s not mentioning the 1500 parks in the area to take a short hike or have a lovely picnic after a paddle.
With well-navigated water trails, you can easily go kayaking in Toronto either alone or with your family and friends. Coupling all of these features with friendly locals and a vibrant culture, Toronto is easily one of the best destinations to kayak.
8 Kayaking Destinations in Toronto
Whether you’re a beginner or an expert, these 8 kayaking Toronto spots below are a must for anyone going kayaking in Toronto!
1. Lake Ontario
Most of Lake Ontario is kayak-friendly, but kayaking Toronto on the Outer Harbour gives access to quiet waters and incredible sunrise views.

Source: Flickr
There are other spots in the list that flow into Lake Ontario, creating a fantastic network to fully explore Toronto by kayak.
The nearby Tommy Thompson Park lets you dock and enjoy a picnic or a birdwatch between paddles.
⇒ Check out our article on Best Spots for Paddle Board in Ontario
2. Humber River
Right in the city’s backyard, Humber River is not to be missed when kayaking in Toronto.
The stretch between Old Mill and the Humber Marshes is where locals love to launch. The wetlands are rich in wildlife, and the currents are gentle.
It’s also a well-known night kayaking Toronto spot.
3. Toronto Islands
Toronto Island kayaking is a thrilling experience for island-hopping lovers. Choose one or more from this collection of 15 small islands and take a ferry to one of them.
There are scenic water trails that lead right into Lake Ontario.

Source: Unsplash
Centre Island, Ward's Island, and Hanlan's Point are the highlights, with lots of access points, beaches, picnic areas, lagoons with calm waters, and lovely gardens.
4. Credit River
It’s only 27 minutes from downtown to Credit River, making it a perfect kayaking Toronto spot for a busy day.

Source: Unsplash
This scenic waterway offers a mix of gentle stretches and class I-II rapids.
An enchanting launch point is Port Credit Memorial Park at the mouth of the river. Erindale Park is also a lovely spot further upstream when the water’s high.
5. Grand River
This kayaking Toronto spot is big enough for a kayaking trip ranging from 1 day to 1 week in slow-moving water.

Source: Unsplash
Nearly 300 kilometers long, it runs through scenic access points in the Caledonia dam area, the quaint town of Paris and other historic communities.
6. Lake Erie
It’s a great spot for kayaking near Toronto. The open waters offer a mix of calm currents and strong waves perfect for challenge seekers.

Source: Flickr
Long Point and Port Dover are locally loved access points. There are plenty of other water trails, filled with sandy beaches and scenic towns, which run from one national park to another.
7. Cherry Beach
It’s a tranquil spot to kayak in Toronto for all skill levels.
You can launch from the eastern end, where the currents are gentle, then kayak to Toronto Island, which is just around the curve.
At night, try paddling a route on a LED-lit glow in the dark kayak and be in awe of the twinkling city skyline.
8. Georgian Bay
The Toronto kayaking experience can never be without the world-famous Georgian Bay, known for its crystal-clear waters and rugged landscapes. Along with Cherry Beach, it’s one of the best destinations for kayaking near Toronto.

Source: Unsplash
It’s home to 30,000 islands, some of which offer sheltered water and stunning rock formations. You can find calm inlets nestling in between challenging open waters.
Where to Rent a Kayak in Toronto?
When planning for a kayaking Toronto experience, there are several kayak rental Toronto options as well as kayak storage Toronto services. Here are some you can consider for your next launch:
1. Harbourfront Canoe & Kayak Centre (rental)
- Rate per hour: $25 CAD for a single kayak and $40 CAD for a tandem.
- Near Toronto's downtown waterfront and Toronto Islands.
2. The Toronto Humber Yacht Club (storage)
- Rate per hour: varied, depending on kayak size and duration.
- Near the Humber River
3. The Toronto Island SUP (glow kayak Toronto rental)
- Rate per tour: from $85 CAD, depending on quantity.
- Easy access to Toronto Islands and Centre Island’s ferry dock.
However, if you plan on making Toronto kayaking a permanent part of your travel, getting your own kayak can provide a better experience.
Even better if it’s a nice quality inflatable kayak, like iROCKER’s! It’s perfect for storage during the winter months or for transport from one access point to another.
Plus, owning your kayak means you’re not limited by rental availability. Hit the water whenever you like!
Enjoy Perfect Kayaking in Toronto with iRocker
These best 8 kayaking Toronto spots take you on adventures through diverse waters and local charms. From locations right near downtown Toronto to waters for kayaking near Toronto, each has unique features that make the city a haven for kayakers of all levels.

To elevate your kayaking Toronto experience, consider the iROCKER Inflatable Kayak. You get more than just a kayak! You will get the freedom of transport, performance and the ability to share the fun with your kayaking partner.
It packs down small and light, so you don’t have to rush traffic getting that first slot at the rental next time you kayak in Toronto.
Let’s dive into your next kayaking adventure with iROCKER and make every moment as comfy as ever!

Photo from Flickr
Knowing your kayak's navigation light requirements is important if you paddle at night as a responsible kayaker. The good news is that the regulations are straightforward: human-powered pleasure craft like kayaks must carry a water flashlight or lanterns that emit white light.
Following this post, you will discover what should a kayaker be able to display at night and how to prepare for your night kayaking trips.
What Should a Kayaker Display at Night?
When kayaking in situations with limited visibility, you must ensure your kayak has the appropriate navigation lights installed.
Here are the requirements you should comply with:
- Prepare and turn on navigation lights when kayaking at night.
- In clear weather, manually propelled boats such as kayaks must have a visible light that can be seen from a minimum distance of two miles.
- It’s recommended to have many lights or a 360-degree navigation light so that the lights are visible from every angle surrounding the kayak.
- Responsible kayakers should have their navigation light ready and turned on before venturing out in low-light conditions.
- To avoid an accident, the white light needs to remain on for a sufficient period. Turning on your light at the last minute puts you and others in danger.
The location and kind of river you are paddling on may impact the specific lighting needs. Make sure you are aware of the regional regulations before you go.
Is Kayaking at Night Safe?
Yes, as long as you follow the right safety procedures, kayaking at night is safe.
According to Canada’s Safe Boating Guide, nighttime kayaking is not necessarily unlawful. However, each region has its own set of rules governing nocturnal paddling. Before going out, be sure you know the restrictions in the area.
In Canada, kayaks are considered human-pleasured vessels. According to the Canada Shipping Act 2001, human-powered vessels must carry a watertight flashlight or lantern that emits white light.

Photo from Unsplash
Is Kayaking at Night Worth It?
The answer is yes.
Although it may seem dangerous at first, night kayaking may be a peaceful and enchanting experience. It will take you to the beauty of nature when it's dark and full of stars.
Risks of Kayaking at Night
Kayaking carries inherent risks, the difficulties and dangers can be increased while out on the river at night.
You can enjoy your time on the water while reducing the likelihood of major accidents by identifying these possible hazards and implementing necessary safety procedures.
Potential kayaking risks:
- Capsizing, flooding, or falling overboard
- Collisions with other boats or obstacles
- Storms and heavy winds
- Hypothermia caused by cold water immersion
- Dehydration
- Wildlife interactions
- Equipment breaks down

Photo from Unsplash
Additional risks of nighttime kayaking:
- Reduced sight makes it difficult to see the surroundings
- Loss of direction in low-light conditions
- Increased collision risk
- Fatigue
- Communication challenges
- Difficulties in rescue attempts if capsized or flooded
Remember you can efficiently handle these additional dangers if you remind yourself of what should a kayaker be able to display at night and take the appropriate safeguards.
Everything You Need to Know about Kayak Lights
Having the appropriate lighting is essential for safety when kayaking at night. Kayak lights have three main functions:
- They help you see.
- They help other vessels see you.
- They help with navigating.
For your kayak, there are a few primary light kinds to equip, each with a specific purpose. Let's go over what should a kayaker display at night and how to use it effectively.
Types of Kayak Light
There are two kinds of kayak lights, one for navigation and the other to lighten the deck.
- Navigation lights
In order to lower the danger of crashes, kayakers are legally obligated to have navigation lights on their kayaks when they are out at night.
Typical kayak navigation lights consist of battery-powered or wired lights with fixed or portable options. You can also choose from incandescent or LED lights.

Photo from Flickr
- Deck Lights
Deck lights are optional for what should a kayaker be able to display at night, but they also secure safety and convenience. They are strip lights or spot lights, with adhesive or magnetic mounting options. There are also rechargeable and disposable options available in the market.
How to Use Kayak Lights at Night
To let other boats know where you are, you at least need a single white light that can be seen from any angle. This is often a deck light that is fixed at the stern.
To improve your visibility further, you should also employ navigation lights (green on the right and red on the left). Place them so that the light is not flashing directly in your eyes.
A handheld light is handy for duties such as reading charts and looking for channel markers. However, don't always leave it on since it might blur your night vision. A LED light is advised only for cases of emergency. You should put it on top of your PFD.
Additional Safety Tips for Kayaking at Night
In addition to the light settings, there are a few other crucial factors to remember for an effective and secure nighttime kayaking experience.
- Avoid a collision of kayaks
Always be mindful of your surroundings and other nearby vessels or watercraft.
Keep your distance and make efficient use of your lights so that it doesn't interfere with your eyesight.
- Plan your route in advance
It's crucial to carefully plan your route ahead of time, marking any landmarks, obstacles, or changeable water conditions that would be hard to see in the dark.

Photo from Flickr
- Dress in layers
You'll be more comfortable and ready for the cold nighttime temperature if you dress in layers of quick dry and breathable fabric.
- Check the weather
Remember to check the weather before you go. Erratic storms or strong winds can rapidly transform an enjoyable paddle into a hazardous trip.
- Prepare all kayaking essentials
Get ready with everything you'll need for a kayak trip, including a dry bag to store your valuables and other devices.
Before heading out, double-check that you have everything you need.
Kayak the Night with Confidence
Night kayaking is an incredibly magical experience, and you can enjoy the unique experience by being well-prepared and putting your safety first.
Apart from knowing what should a kayaker be able to display at night, careful route planning and maintaining visibility throughout the journey are important to have a risk-free and enjoyable trip.
If you're thinking about kayaking at night, try iROCKER’s inflatable kayaks. These kayaks are renowned for their stability, maneuverability, and user-friendliness. They'll elevate your nocturnal kayaking adventure to the next level.
FAQ
Navigating the waters at night can raise many questions, especially about safety and best practices. Here are some answers to common questions to help make your paddling adventures safe and enjoyable.
1. What color all around light should a non powered canoe or kayak display at night?
A non-powered canoe or kayak should carry a white light—like a lantern or flashlight—visible in all directions. While not bound by the same navigation light rules as powered vessels, having a bright white light helps ensure you’re seen by other boats at night, keeping you safe on the water!
2. What must be carried at night by the operator of a canoe or kayak that is not equipped with running lights?
For canoes or kayaks without running lights, it’s crucial to carry at least one working watertight flashlight. This flashlight acts as a navigation light, helping to ensure visibility and safety during nighttime paddling adventures. Whether signaling to others or illuminating your path, having a watertight flashlight on board is a must!
3. What should a rowboat be able to display at night to prevent a collision?
To prevent a collision at night, a rowboat should display a white light that is visible to other vessels. This applies between sunset and sunrise or during restricted visibility, ensuring that others can see and avoid your boat in time.
4. Do I need red and green lights on a kayak?
Nope, red and green lights aren’t required for kayaks on U.S. or international waters. But if you like to go the extra mile, the Coast Guard allows you to add them. It’s a handy upgrade, especially in busy or low-visibility waterways!

Attention all thrill-seekers and water enthusiasts! Brace yourselves to plunge into the enchanting realm of paddle boarding! As you set sail on this exhilarating adventure, a crucial choice awaits you - selecting the ideal board size. The "10' vs 11' paddle board" discussion is a widespread conundrum, with each size boasting its unique advantages and sparking an enticing clash of features. So, amidst this riveting rivalry, which stand up paddle board will emerge as your perfect ally on the waves? Let's take a deeper dive and figure out which board best suits your unique needs!
A Comparison: 10' vs 11' Paddle Boards
The "10' vs 11' paddle board" dilemma is a classic showdown in this realm, both boasting unique strengths.
- Performance
- Stability
- Speed
- Manoeuvrability
- Weight Capacity
- Volume
So, which one will turn out to be your ideal partner in the water? Let's plunge in.
Performance
Board size can significantly influence the performance of your paddle board. The 10' paddle board presents a stellar performance at cruising speeds, effortlessly gliding over the water's surface, a prime example being the sterling iRocker All Around 10. On the flip side, the 11' counterpart outperforms in terms of speed and glide efficiency.
Stability
The 10 foot paddle board, with its broad nose and tail, delivers top-notch stability, ensuring a smooth, relaxing ride, make it a perfect fit for novice paddlers and leisurely paddling enthusiasts. Yet, the 11' paddle board, with its extended length, ensures superior stability, especially for taller or heavier paddlers.
Speed
While the 11' paddle board certainly takes the cake for top speed, the 10' board, such as the dynamic iRocker All Around 10', showcases its prowess at cruising speeds. Boasting an average cruising speed of around 3.2 MPH, it is the go-to choice for a laid-back, leisurely paddle session.
Maneuverability
In the battlefield of maneuverability, the 10ft paddle board reigns supreme. Its compact length allows for swift turns on the water, making it a top pick for activities requiring nimble movements. Comparatively, the 11' board might lack a bit in flexibility but offers superior straight-line performance, strengthening the paddle board 10 vs 11 face-off.
Weight Capacity
Generally, the 11' paddle boards can shoulder more weight, making them the ideal choice for slightly larger paddlers or those carrying additional gear. A 10' board, while it has a lower weight capacity, still manages to handle a reasonable load and is a great fit for smaller paddlers.
Volume
An 11' paddle board generally has more to offer when it comes to volume, promising enhanced buoyancy and stability on the water, pushing the “10ft paddle board vs 11ft comparison” further. However, the 10' board, although having a slightly lesser volume, still provides ample buoyancy and proves easier to handle, especially for lighter or smaller users.

Which is the Right Choice for You?
Selecting the right paddle board can seem like a daunting task, especially when faced with the "10' vs 11' paddle board" debate. Fret not, adventurers! We're here to make your journey smooth and exciting, by helping you choose the best paddle board for your needs via:
- Your Height and Weight
- Weight and Transport
- Your Intended Use
- Your Skill
- Body of Water
- Your Preference
Your Height and Weight
A paddle board's performance is highly influenced by the user's physique. Smaller individuals, particularly those under 5'8" or lighter, find a 10' paddle board more accommodating. In contrast, the 11' paddle board, with its increased surface area and stability, is more suitable for taller or heavier paddlers.
Weight and Transport
If portability tops your checklist, the smaller size of the 10’ inflatable paddle board makes it somewhat easier to handle and carry. The 11' board, although slightly heavier due to its increased size, is still surprisingly manageable
But, if you opted for an inflatable SUP model, both sizes will offer superb convenience when it comes to transport, making your water adventures a breeze!
Your Intended Use
Whether it's yoga, fishing, or thrilling rides, your paddle boarding goals significantly shape your choice. If your adventures involve speed, long-distance cruising, or fishing, an 11' paddle board is your match, offering faster gliding and ample space.
On the other hand, if your focus is on yoga or recreational paddling, or you just prefer a more relaxed pace, the nimble 10' paddle board should be your go-to. Its excellent stability and control make it ideal for yoga poses or leisurely cruises, offering an unforgettable experience every time you hit the water.
Your Skill
For beginners, a 10' paddle board offers confidence-boosting stability and is easier to maneuver, making it a great learning tool. On the other hand, more experienced paddlers looking to enhance their glide efficiency and speed will benefit from the 11' paddle board, a representative for this is the iROCKER All Around 11'.

Body of Water
The 11' paddle board stands out in choppy waters or when embarking on long touring trips due to its superior stability and speed. Conversely, a 10' board, due to its shorter length and great maneuverability, thrives in calm waters and is perfect for casual cruising.
Your Preference
Ultimately, the decision between a 10’ vs 11’ paddle board boils down to personal comfort and preference. If possible, test all sizes to get a real feel for what suits you best.
For the lightweight paddler, or the beginner finding their footing, the 10' paddle board is ideal. On the other hand, if you are taller, heavier, or a seasoned paddler eager for speed and distance, the 11' paddle board is your bold and trusty ally. Its longer form and greater volume offer stability in rough waters and support for those longer touring trips.
With iROCKER, finding your perfect company in paddle boarding is a breeze. So, let's get you suited up and on the water, having the time of your life! Contact us to dive in now!

FAQs:
Regarding this comparison, we've included some frequently asked questions to clear all your lingering doubts.
Can an 11' paddle board handle rough water conditions better?
Absolutely! The longer and roomier 11' paddle board is a champ in navigating those choppy waves. Its extra length and volume gift it the stability and command to confidently cruise through those tempestuous waters.
Can children use an 11' paddle board, or is a 10' paddle board more suitable?
Generally, a 10' paddle board is more suitable for children, as it's easier for them to maneuver due to its shorter length and less volume. That being said, an 11' paddle board could be appropriate too, provided the child is adequately skilled and supervised during usage.

If you're an adrenaline junkie or tranquil traveller seeking new thrills, you're at the right place! Embrace your wanderlust and indulge in an immersive experience in Victoria, BC. This guide is all you need to make the most of paddle boards Victoria BC. With a surge in the popularity of water sports, paddle boarding in the region is on the rise. From serene lakes to scenic harbours, Victoria promises unforgettable paddle boarding experiences that you simply can't resist.
Immerse yourself in the allure of nature and the irresistible call of adventure. The following destinations provide some of the best opportunities for paddle boarding in Victoria BC, inviting you to delve into this thrilling sport.
DISCLAIMER: Before traveling to a paddle location, ensure that the location still allows for paddle boarding and make yourself aware of any rules and regulations in place.
1. Thetis Lake Regional Park
Nestled just 30 minutes from the pulsing heart of Victoria, the enchanting Thetis Lake Regional Park awaits. Renowned for its breathtaking lakes enveloped by lush forestry, it's a paradise for paddle boards Victoria BC enthusiasts.

source: freepik
The park's diverse ecosystem includes swamps, lakes, forests, and hilltops, making it a great spot for nature lovers. Here, you have the chance to embark on an exhilarating 40 km journey on your paddle board across spellbinding waterways.
- Skill Level: Suitable for various skill levels due to the diversity of the water body.
- Travel Time: Located approximately 12 km from downtown Victoria, it takes about 20 minutes to drive to the park.
- Launch Points: From the main car park on the park's south side, you'll find convenient access to Thetis Lake beach - an ideal spot to launch your SUP and a beloved swimming location among locals, as well as a second parking lot equipped with a boat launch.
- Type of Water: Providing a mix of calm and slightly more challenging water conditions since the park is dominated by Upper and Lower Thetis Lakes, connected by a narrow culvert.
- Best Time to Visit: The park is open year-round, but the best time for paddle boarding is during the warmer months. Spring brings a beautiful display of wildflowers, enhancing the experience.
2. Sooke Potholes Provincial And Regional Park
A tranquil one-hour's drive west of Victoria reveals the serene beauty of Sooke Potholes Provincial And Regional Park.
The heart of the park is the Sooke River, offering calm, inviting waters ideal for all skill levels looking to paddle board Victoria BC experience. The river's unique geological formations create deep pools that are not only great for swimming but also add to the scenic beauty of the paddle boarding adventure.
- Skill Level: Suitable for all levels, from beginners to advanced paddle boarders.
- Travel Time: The park is approximately a 60-minute drive from Victoria, making it a convenient day trip for those in the area.
- Launch Points: Paddle boarders can access the Sooke River from various points within the park.
- Type of Water: The Sooke River is characterized by its calm waters, ideal for a relaxed paddle boarding experience.
- Hazards: Be aware of your surroundings and follow safety guidelines, especially during times of increased water flow or when wildlife is present.
- Best Time to Visit: The park is open from sunrise to sunset, offering ample time for a full day of paddle boarding. Summer is a particularly good time to visit, with warm weather and clear skies enhancing the experience.
3. Matheson Lake Regional Park
Approximately 45 minutes from Victoria, Matheson Lake Regional Park offers the perfect setting for paddle boarding Victoria BC.

source: freepik
Known for its tranquil, mirror-like waters, it's a hotspot for inflatable paddle boards, where you can savour the calm waters and sharpen your paddle boarding skills.
- Skill Level: The park is great for beginners due to the calm and tranquil waters of the lake.
- Launch Points: Paddle boarders can access the lake from various points along its shore. There's a small sandy beach area that's particularly convenient for launching paddle boards.
- Type of Water: The lake is known for its mirror-like, tranquil waters, which are ideal for a smooth and relaxing paddle boarding experience.
- Best Time to Visit: The beach area can get busy during the summer months, but it remains a peaceful place for water activities.
4. Elk/Beaver Lake Regional Park
Just a 20-minute drive from the heart of Victoria, this diverse park is open to all water-sport enthusiasts.
Loved by locals, the park boasts sandy beaches, providing the perfect launch spot for your paddle board Victoria BC adventure.
- Skill Level: Suitable for paddle boarders of various skill levels.
- Travel Time: About 20 minutes from downtown Victoria.
- Launch Points: Multiple, including Beaver Beach, Hamsterly Beach, Brookleigh Road Boat Ramp, and near the Victoria City Rowing Club.
- Water Type: Freshwater lakes.
- Hazards: Popular with various recreational activities; be aware of other water users.
- Additional Info: The park has forested shores and multiple beaches.
- Best Time to Visit: Open from sunrise to sunset, suitable for day-long adventures. The park is particularly enjoyable during the warmer months when the weather is perfect for water sports.
5. Inner Harbour
Right in the heart of downtown Victoria, the Inner Harbour provides a gentle, scenic paddle boarding route.

source: unsplash
The rich cultural heritage and historical charm of the area enhance the experience, offering more than just a workout.
- Skill Level: Varies; some caution is needed due to boat traffic.
- Launch Points: Various along the harbour.
- Water Type: Sheltered waters, relatively calm.
- Hazards: The Inner Harbour may feature busy traffic, including Harbour Ferries, seaplanes, pleasure boats, and large ferries. Paddlers need to be vigilant and should never assume they have the right of way.
- Additional Info: Offers views of historic buildings and wildlife like harbour seals.
- Best Time to Visit: Summer here offers pleasant weather and longer daylight hours, enhancing the paddling experience.
6. Gorge Waterway
A brief drive from downtown Victoria will take you to the Gorge Waterway. This 6 km stretch of the sea offers a unique blend of industry and unspoilt nature.
Paddle boarding through this passage delivers an unparalleled sightseeing adventure.
- Skill Level: Suitable for various skill levels, including beginners.
- Travel Time: A brief drive from downtown Victoria.
- Launch Points: Along the Gorge Waterway.
- Water Type: Tidal estuary with scenic views.
- Hazards: Varying currents with the tide, and congested areas with ferry and training activities. Avoid Tillicum Narrows during strong currents.
- Best Time to Visit: Anytime, with caution around Tillicum Narrows.
- Additional Info: The route offers a mix of industrial and natural scenery, passing landmarks and bridges.
7. Langford Lake
Presenting the largest body of water in Victoria, Langford Lake is the ultimate destination for those hungry for paddle board adventures.

source: freepik
Its serene waters and efficient wind shielding make it an irresistible haven for paddle board enthusiasts craving an exhilarating session on the water.
- Skill Level: Ideal for all skill levels, including beginners.
- Travel Time: Located on the west side of Victoria.
- Launch Points: Langford Lake Beach Park, Paisley Park, or the boat ramp.
- Water Type: Warm, calm waters.
- Hazards: Partially surrounded by houses, might not feel completely secluded.
- Best Time to Visit: Accessible year-round, popular for dawn-to-dusk activities.
- Additional Info: Features a swimming platform, fishing spots, and sandy beaches.
8. Cadboro Bay
Tucked away in Oak Bay, Cadboro Bay offers a welcoming haven for paddle boarding Victoria BC.
If you're one for urban legends and thrilling mysteries, keep your eyes peeled for the mythical "Cadborosaurus" that is said to reside in these waters.
- Skill Level: Suitable for paddle boarders of all levels.
- Travel Time: Located in Oak Bay.
- Launch Points: Cadboro-Gyro Park.
- Water Type: The bay offers a sheltered water environment with stunning views of the Olympic Mountains. Its tranquil waters are ideal for a relaxed paddle boarding session.
- Hazards: While the bay is relatively safe, paddlers should always be cautious of marine life. The mythical "Cadborosaurus" legend adds a unique twist to the paddling experience, though it's more of a fun tale than an actual hazard.
- Additional Info: Family-friendly beach with a nearby rental shop in Cadboro Bay Village.
9. Brentwood Bay
A short, scenic 30-minute drive from Victoria whisks you away to the serene Brentwood Bay. A charming 2.6km paddle route waits to welcome beginners to the world of paddle boarding.

source: unsplash
It's perfect for those novices who aim to master their balance and savour their first paddle board Victoria BCadventure.
- Skill Level: Suitable for beginners and more advanced paddlers.
- Travel Time: Approximately 30 minutes from Victoria.
- Launch Points: Located in Portside Marina, near the Brentwood/Mill Bay ferry terminal.
- Water Type: A unique mix of ocean paddling and calm, protected waters, similar to a lake.
- Best Time to Visit: Open from March to October. Closed from November to February.
- Additional Info: Offers a range of activities including rentals, tours, and lessons. The area provides a blend of wildlife, scenery, and ocean paddling experiences.
10. Gonzales Beach
Another cherished spot among locals, Gonzales Beach offers calm waters set against a laid-back atmosphere, making it another ideal paddle boards Victoria BC spot.
It's the ideal setting for a peaceful paddle boarding session, letting you slow down, unwind, and let the rhythm of the waters guide you.
- Skill Level: Ideal for all skill levels.
- Water Type: Calm waters in a sheltered bay.
- Best Time to Visit: Gonzales Beach is most popular during the summer months. However, the beach and the ocean never feel overly crowded, providing a tranquil experience.
- Additional Info: Known for its soft sand and relaxed atmosphere, making it a great spot for a peaceful paddle boarding session.
11. Willows Beach
Hidden in Oak Bay, Willows Beach is a gem among paddle boarding Victoria BC spots. Its stunning scenery and diverse marine life make for an immersive, sensory-rich paddle boarding experience.

source :freepik
This spot is more than just a paddle boarding location; it's a journey into the vibrant, captivating heart of Victoria's marine world.
- Skill Level: Suitable for various skill levels.
- Travel Time: Situated in Oak Bay.
- Launch Points: From the beach.
- Water Type: Offers stunning views and diverse marine life.
- Hazards: Check for strong winds before heading out.
- Best Time to Visit: Good for year-round paddling.
- Additional Info: Known for its vibrant marine life and beautiful scenery.
12. Esquimalt Lagoon
Located on Victoria's west side, Esquimalt Lagoon boasts a breathtaking 2-km stretch of sandy beach, offering an idyllic playground for your paddle boarding Victoria BC journey.
With a rich tapestry of bird life and a panorama of captivating views, this will inevitably gift you a memorable encounter with Victoria's thriving natural beauty.
- Skill Level: Ideal for all skill levels.
- Launch Points: Along Ocean Boulevard on the Coburg Peninsula.
- Water Type: Sandy beach facing east.
- Hazards: Watch for natural wildlife and marine traffic.
- Best Time to Visit: Great for morning paddle boarding.
- Additional Info: You can explore nearby landmarks like the Fisgard Lighthouse.
13. Sawluctus Island Loop
Sawluctus Island, is located in British Columbia, Canada. It is situated near the head of Finlayson Arm, at the southern end of Saanich Inlet, just west of Victoria.

source: freepik
The island is known for its picturesque setting and is a popular spot for paddle boards Victoria BC. The Sawluctus Island Loop is a tranquil 3.2 km journey that starts and ends at the marina, offering an immersive experience in nature with the allure of adventure.
- Skill Level: Beginner-friendly.
- Launch Points: Launch from Millstream Launch.
- Water Type: Encounters stronger currents along the route, suitable for paddle boards Victoria BC.
- Hazards: Restricted areas south of the marina and around private docks.
- Best Time to Visit: Anytime, also offers hiking and snorkeling opportunities.
- Additional Info: A 3.2km journey that provides a tranquil experience with an exciting challenge from the currents.
14. Finlayson Arm Fjord
Brace yourself for an adventure that tugs at your spirit at the Finlayson Arm Fjord. This engaging 12km route between Brentwood Bay and Millstream presents an intoxicating mix of thrill and tranquility.
The mirrored fjord waters reflecting the sky, framed by awe-inspiring landscapes, make this journey a visual and physical feast for paddle boarding Victoria BC.
- Skill Level: Suitable for more adventurous paddlers.
- Travel Time: Between Brentwood Bay and Millstream.
- Water Type: Mirrored fjord waters in a stunning landscape.
- Hazards: The length of the route (12km) and potential natural challenges.
15. Circumnavigate Piers Island
For those whose hearts beat for the thrill of exploration, circumnavigating Piers Island is a must for paddle boarding in Victoria, BC.

source: freepik
This 4.8km route invites you to discover unique landscapes and abundant marine life encircling the island. While the distance and intermittent strong currents demand advanced skills, the rewards of this vibrant journey are truly priceless.
- Skill Level: Advanced, due to distance and strong currents.
- Launch Points: Around Piers Island.
- Water Type: Encounters with strong currents and diverse landscapes.
- Hazards: Intermittent strong currents and longer distance (4.8km).
- Additional Info: An explorative journey offering unique landscapes and abundant marine life.
Getting Started with Paddle Boarding in Victoria BC
Before you hit the water, it's essential to gear up and prepare adequately for your paddle boarding experience via:
- Necessary Gear and Preparations
- Tips and Tricks for Paddle Boarding in Victoria BC
- Safety Measures
Necessary Gear and Preparations
Getting ready for your first paddle board Victoria BC adventure means preparing your gear. This preparation extends beyond just your stand up paddle board:
- Paddle board: Choose from a sturdy hard or a inflatable paddle board, whatever best suits your needs.
- Leash: A leash keeps your paddle board close, so you never lose your ride.
- Paddle: Ensure your paddle is of the right length, typically standing 6 to 10 inches taller than you, for optimal paddling.
- Personal Floatation Device (PFD): Canadian law considers paddle boards to be vessels, and a PFD is legally required. More importantly, it could save your life.
Tips and Tricks for Paddle Boarding in Victoria BC
Paddle boarding is as much about technique as it is about strength. Here are some pro-tips:
- Start on Calm Waters: As a beginner, opt for calm waters for a smoother, more controlled paddle boarding experience.
- Use Your Core: While paddling, use your core instead of your arms. This technique will conserve your energy and improve balance.
Safety Measures
Always check the weather conditions before heading out, and never paddle board alone, especially as a beginner. Additionally, be respectful of marine life and other water users.
- Check the Weather: Always check weather conditions before venturing out on the water. Safe paddle boarding depends on it!
- Always Have Company: If you are a beginner, avoid paddle boarding alone. It's safer and more fun to have company.
- Respect Marine Life: Appreciate the stunning marine life from a distance, and remember to share the water responsibly with all users when they experience paddle boards Victoria BC.
Paddle Boarding in Victoria BC with iROCKER
Embrace the call of adventure with paddle boarding Victoria BC, a thriving oasis of water sports brimming with picturesque spots ready to be explored. From the serenity of Langford Lake to the mythical allure of Cadboro Bay, the heartwarming charm of Brentwood Bay, and the nature's theatre at Esquimalt Lagoon, there's a world waiting to unfold beneath your paddle board.
Don't wait another day. With iROCKER, grab your paddle board, answer the call and contact us now to embark on your riveting adventure today!

Welcome to the ultimate Jericho beach paddle boarding guide! Get ready for an exciting adventure in one of Vancouver's most vibrant and picturesque locations. Jericho Beach is a paradise for water sports enthusiasts, offering a wide range of paddle boarding opportunities for all skill levels. So, grab your stand up paddle board, put on your sunscreen, and let's dive into this epic paddle boarding experience!
Why Choose Jericho Beach for Paddle Boarding?
When it comes to paddle boarding, Jericho Beach should be at the top of your list. Jericho Beach is located at the west end of Point Grey Road, between Wallace Street and Discovery Street, on the north side of Jericho Park. Swimmers use the beach's east side, while sailors and windsurfers use its west side.
What sets this beach apart is its unique combination of stunning natural beauty, tranquil waters, and a vibrant water sports community. The moment you set foot on Jericho Beach, you'll be captivated by its breathtaking views of the ocean and majestic mountains. It's a place where you can connect with nature, challenge yourself, and have a whole lot of fun!
For starters, the ocean can be unpredictable due to stronger waves and tides that can make it trickier for beginners to navigate. Sometimes, they can change instantly, kick up sand and silt and make water murkier and harder to see through. However, Jericho Beach in Vancouver is a great place for paddle boarding. The water is calm and flat, which is great for beginners. You can also paddle along Jericho Beach safely!

Best Spots for Paddle Boarding in Jericho Beach
Jericho Beach in Vancouver is a great place for paddle boarding. It is easy to access, and the water is generally calm and flat. You can paddle along with your family or friends in the summer.
The Calm of Jericho Beach East
On the eastern side of Jericho Beach, there’s a haven of calm and serenity. The tranquil waters make it perfect for beginners and those seeking a peaceful paddle boarding session. That’s why Jericho Beach in Vancouver is the ideal spot to practice your balance if you want to learn paddle boarding.
Some of the nicest views of the coastal cityscape are also available to you while you paddle! For something genuinely breathtaking, come here for a paddle at sunset. What’s more, you don't need to hike with your equipment to go to this beach because it's close by.
The Thrill of Jericho Sailing Centre Area
Jericho Sailing Centre is a community center that provides low-cost access to English Bay for small naturally powered craft, whether it be sail, row, or paddle. It is perfectly placed on English Bay’s south shore and offers a full range of facilities and programs. This spot is buzzing with energy and offers a playground for experienced paddle boarders.
It's an opportunity to challenge your skills, push your limits, and unleash your inner adventurer.

Preparing for Your Paddle Board Jericho Beach Adventure
Before embarking on your paddle boarding adventure, it's essential to be well-prepared. Here are some must-have gear and tips to ensure a safe and enjoyable experience:
Must-Have Gear:
- A sturdy and reliable paddle board that suits your skill level.
- A personal flotation device (PFD) that is secure and comfortable.
- A paddle that is the right size for you and provides good control.
- Sunscreen protects your skin from UV radiation.
- A leash keeps you connected to your board and prevents it from drifting away.
- Water shoes or sandals for added grip and protection.
Safety Tips:
-
Learn the Basics: If you're new to paddle boarding, take a lesson or guided tour for confidence and effective water navigation. Stay vigilant for potential dangers in the water and surroundings. Stay safe and have fun!
-
Stay Hydrated: Don't forget to bring water with you to stay hydrated throughout your paddle boarding session. It's essential to keep your energy levels up and enjoy the experience.
-
Save the Environment: While paddle boarding at the beautiful Jericho Beach, mind the ecosystem, wildlife, and cleanliness. Preserve this paradise for generations to come. Let's cherish our pristine environment!

Tips and Tricks for Jericho Beach Paddle Boarding
To truly make the most of your paddle boarding adventure at Jericho Beach, here are some local insights and useful tips:
Local Insights:
-
Great news! Ample parking is nearby, just a short walk from the beach. No need to go far for inflating your paddle board with an electric pump. Convenient and hassle-free!
-
You may have a smooth ride and learn some basic skills of paddle boarding in Jericho. However, avoid the east side, where swimmers gather, for uninterrupted practice.
-
In Jericho, you may see many seals! Don't forget waterproof bags for your camera/phone to capture underwater photos. We highly recommend it!

Weather & Sea Conditions
Jericho Beach is blessed with a variety of weather and sea conditions, making it a dynamic playground for paddle boarders. However, it's always a good idea to check the weather forecast and sea conditions before heading out. Pay attention to wind speed, wave height, and tides.
There may be some waves on windy days because this beach is on the Pacific Ocean coast. But the winds tend to calm down closer to sunset.
We hope this will help you plan your paddle boarding Jericho beach sessions accordingly and ensure a safe and enjoyable experience. Whether you're a novice or an expert, Jericho Beach caters to all levels. For more valuable information, visit IROCKER’s Blog. Happy paddling!

Lake Louise, a gem nestled within Canada's Banff National Park, is renowned for its surreal turquoise waters framed by dramatic peaks and lush forests. It's a poster child for the rugged beauty of the Canadian Rockies. Every year, thousands of visitors are drawn to this serene spot to indulge in various outdoor activities, from hiking to skiing. But what about stand-up paddle boarding (SUP)? Can you paddle board on Lake Louise? Buckle up, because the answer is a resounding 'YES'!
Can You Paddle Board on Lake Louise?
Yes, paddle boarding is allowed on Lake Louise. Over the years, SUP has gained popularity, and the park authorities permit it, making the lake a favorite spot for both beginner and expert paddle boarders. The serene atmosphere, clear waters, and breathtaking scenery provide a unique and peaceful SUP experience.
With a dash of knowledge about its regulations, you're all set for an unforgettable escapade on Lake Louise.
The Allure of Paddle Boarding Lake Louise
Immerse yourself in the soul-stirring beauty of Lake Louise, an enchanting locale adding unique charm to your paddle boarding experience. So, grab your stand-up paddle board and embark on a journey of tranquility as you glide across the crystal-clear waters that will leave you in awe.
A visual delight and a noteworthy experience
Imagine the jaw-dropping, shimmering waters of Lake Louise, where a dramatic landscape of towering peaks unfolds. Every paddle stroke ignites a thrill that will send your adrenaline soaring.
- Dive into the Turquoise: Enjoy the crystal-clear, turquoise waters, a perfect contrast to the lush green forests and snowcapped mountains.
- Sun-Kissed and Wind-Swept: Experience the thrill of paddle boarding under the warm summer sun, as cool mountain breezes refresh you.
- Nature's Spectacle: Keep your eyes on the shoreline as you may just spot some of nature's finest creatures including moose, deer, and even bears, from a safe distance of course!

Paddle Boarding Regulations on Lake Louise
As you glide across the mesmerizing turquoise waters of Lake Louise, you're not just undertaking a thrilling journey, but also becoming a part of this rich ecosystem. Hence, the following steps are designed to protect it:
- Getting Your Self-certification Permit: A self-certification permit is required as a passport to enter Lake Louise. It's a quick and easy step, designed to ensure your gear is free of any invasive species.
- Stopping by at Lake Louise Inspection Stations: If you have any doubts about your gear meeting the Clean Drain Dry requirements, just pop into one of the Lake Louise Inspection Stations. The friendly and helpful staff will give your gear the once-over.
With these regulations, we're not just safeguarding ourselves, but also preserving the unspoiled beauty of Lake Louise. So paddle on with pride, rejoice in the knowledge that you're doing your part, and relish every moment in this incredible place!
Physical Features of Lake Louise
Let's take a deeper dive into the magnificent expanse of the Lake. Lake Louise unfolds over 1.5 mi (2.4 km) northeast and broadens to 0.75 mi (1.2 km) at its widest. Located in the heart of Alberta's Banff National Park, Lake Louise sets a grand stage for stand up paddle board enthusiasts.
There are two key areas that define the region. First, the accessible Lake Louise Village via the Trans-Canada Highway, and second, the tranquil Upper Lake Louise, housing the grand Chateau and a variety of enticing outdoor activities. A perfect blend of accessibility and adventure awaits you!

What You Need to Know: Lake Louise Paddle Boarding
From season changes to safety measures and insider tips, let's delve into making your adventure a resounding success.
How to get there
Let's break down your journey to this dream destination:
| Steps & Information | |
|---|---|
| By Road | - From Calgary: Take the TransCanada Highway (Hwy#1) - From Edmonton: Head south on Hwy#2, then merge onto the TransCanada Highway (Hwy#1) near Calgary - From Vancouver: Prepare for a memorable 10-hour drive - From Jasper: Access Lake Louise via the scenic Icefields Parkway Note: Winter road conditions require snow tires and chains |
| By Air | - Fly to Calgary International Airport (YYC) - 121 mi (195 km) from Lake Louise - Fly to Edmonton International Airport (YEG) - 280 mi (450 km) away Note: Car rentals are available at both airports. Expect a journey of around 3 hours from Calgary and roughly 6 hours from Edmonton to Lake Louise |
| By Train | - Reach Lake Louise via Jasper, connected by rail to various cities like Toronto, Winnipeg, Saskatoon, Edmonton, and Vancouver |
| By Bus | - Shuttle bus services operate from Calgary International Airport directly to Lake Louise Note: Alternatively, from downtown Calgary, a bus ride will get you to Lake Louise in about 3 hours |
Best time to Paddle Board on Lake Louise
Around June through August, with the temperature between 15°C to 25°C (59°F to 77°F) is the sweet spot of the Lake Louise calendar, alongside daylight generously stretched out, you're gifted with this majestic aquatic playground.
However, for ones who seek to steer clear of the summer crowds, late spring (May) and early fall (September) hold their unique charm. During these transitional months, the weather remains pleasantly warm, setting the stage for peaceful paddle boarding adventures.
Prioritizing Safety
Paddle boarding on Lake Louise, while thoroughly enjoyable, requires utmost safety and respect for the local environment.
- Brace for the Chill: Lake Louise's waters can be cold and could potentially cause hypothermia. Always take necessary precautions to stay warm.
- Safety Gear is Key: Always put safety first by wearing a PFD.
- Stay Shore-Close: To minimize risks, it's advisable to stay close to the shore, especially if you're a novice paddle boarder or have children on board.
- Children's Safety: If paddle boarding with children, ensure they're experienced enough, wearing life jackets, and always under adult supervision when on the water.
Insider Tips
Looking for a flawless and memorable experience on Lake Louise? Then aim for early mornings or evenings when the lake's waters are at their calmest and consider these tips:
- Keep It Clean: By ensuring your paddle board is clean and dry before and after each use, you're helping keep Lake Louise pristine.
- Chat with the Locals: Don't hesitate to ask for tips and advice from the friendly staff at rental shops. They're there to help you have the best day possible!
Embracing the Lake Louise Watersport Culture
Beyond paddle boarding, Lake Louise and the surrounding areas like Canmore and Kananaskis, form a bustling hub for a variety of watersports. From the tranquil paddling waters of Moraine Lake and Rundle Forebay Reservoir to the captivating mountain views from Quarry Lake, there is something for every water sports enthusiast in this region.

Unleash Your Spirit of Adventure: Paddle Boarding at Lake Louise
With its awe-inspiring landscape and crystal-clear turquoise waters, paddle board Lake Louise is an irresistible magnet for paddle boarding enthusiasts worldwide. By stepping onto our iRocker boards, you join a global community of enthusiasts dedicated to preserving the natural splendor of Lake Louise.
It's time to answer the call to create ripples of adventure on Lake Louise. Come, be a part of this mesmerizing journey by calling us and unveiling the beauty of Lake Louise! Your paddle board is waiting.

Every adrenaline-pumping adventure calls for the right gear. Yes, you got your paddle board already, but what about your suit? As you look forward to thrilling water-sport activities and paddle boarding experiences, the wetsuit vs drysuit debate inevitably comes into the picture. Maximizing your aquatic exploits requires a keen understanding of these two pieces of equipment. So, let's plunge into the details!
What is a Wetsuit?
A wetsuit is a marvel of modern design that serves as a protective shield for aquatic enthusiasts. Built from neoprene, a synthetic rubber celebrated for its insulation, a wetsuit is your trusted companion in combating chilly waters.

How it works: As soon as you jump into the water, a small amount of water gets into the wetsuit and touches your skin. Your body responds by generating heat with this thin layer of water. This warmth is held captive within the wetsuit, creating a protective barrier that aids in maintaining your body temperature, even amidst cold water. The outcome is a warm, insulating layer that guards against the cold, enabling you to relish extended periods of water fun in colder environments.
What is a Drysuit?
A drysuit is designed to prevent any water from entering – a vital piece of gear for adventurers who dare to explore the colder reaches of our underwater world. It is made from waterproof materials like neoprene, rubber, or laminated nylon, it envelops your body, sealing at the neck and wrists to prevent water from sneaking in entirely, unlike a wetsuit–which allows a small amount of water to enter and then uses your body heat to warm it.

How it works: Once you're wearing a drysuit, you get to wear cozy layers that you can adjust based on just how cold the water is. A handy waterproof zipper makes getting in and out of it a breeze, and there are even special valves that let you control your buoyancy in water. Don't forget to let out any excess air within the suit before paddling for safety.
Key Differences Between Wetsuits and Drysuits
Each suit has its merits that can impact your adventure, especially when paddle boarding. Let's dive deeper into this discussion.
| Feature | Wetsuit | Drysuit |
|---|---|---|
| Material | Made of neoprene, a type of synthetic rubber. | Often made of waterproof fabrics like nylon or neoprene, with waterproof seals. |
| Design Purpose | Designed to allow a small amount of water in, which is then warmed by the body. | Designed to keep you completely dry, with seals at the neck, wrists, and sometimes the face. |
| Temperature Range | Generally used in warmer conditions, suitable for water temperatures above 10°C (50°F). | Suitable for colder conditions, can be used in water temperatures well below 10°C (50°F). |
| Insulation | Provides thermal insulation through the water trapped inside and the neoprene material. | Insulation depends on the undergarments worn beneath the suit; the drysuit itself is not insulating. |
| Buoyancy | Increases buoyancy due to the neoprene's natural buoyancy. | Less inherently buoyant, but often requires wearing a buoyancy control device. |
| Mobility | Offers good flexibility and mobility, but can be restrictive depending on thickness. | Generally offers more room and is less restrictive on movement, but can feel bulkier. |
| Fit | Needs to fit snugly to minimize water flow and maximize warmth. | Looser fit to accommodate insulating layers underneath. |
| Sealing | Does not have seals; instead, it fits tightly to minimize water entry. | Equipped with seals at the neck, wrists, and sometimes ankles to prevent water entry. |
| Usage | Commonly used for surfing, paddle boarding, diving in warmer waters, snorkeling, and other water sports. | Preferred for diving in cold water, kayaking, SUPing and activities in extremely cold conditions. |
| Maintenance | Easier to maintain; just rinse with fresh water and dry. | Requires more careful maintenance, especially of the seals and waterproof zippers. |
| Longevity | 5 to 10 years | 15 to 20+ years |
| Cost | Generally less expensive than drysuits, around $150 to $300. | More expensive due to the specialized materials and construction, and can start from $250 to over $1,500. |
Wetsuit vs Drysuit: What to Choose?
When deciding between a wetsuit and a drysuit, consider several factors to make the best choice for your water activity

1. Water Temperature
A wetsuit is your trusty ally regarding moderately cold to warm water since they are made of neoprene, a material designed to keep you warm by trapping a thin layer of water against your skin that your body heats. A drysuit wins hands down if you are daring enough to face icy, frigid waters. These suits are designed to keep you completely dry, with insulation layers you can adjust to your comfort, making them the undisputed champion in colder conditions.
2. Your Intended Activity
If you're deciding between a wetsuit vs drysuit for paddle boarding, it's important to consider the degree of activity and flexibility you'll need. Wetsuits, designed to fit snugly, can potentially limit certain movements, but they are less bulky and more hydrodynamic, which could give them the edge in high-energy activities. However, while possibly a bit bulkier, drysuits offer more freedom of movement, making them the winner for activities requiring a larger range of motion.

3. Personal Preference
Some enthusiasts might favour the secure, close-to-skin fit of a wetsuit, while others could lean towards the roomier and more flexible nature of a drysuit; hence, your comfort and preference are pivotal when considering drysuit vs wetsuit for paddleboarding. Ultimately, the best suit is the one that aligns with your personal comfort, letting you paddle board with ease and joy. Choose the suit that allows you to make the most of every wave!
4. Your Budget
Wetsuits may be the victor in the value-for-money battle since drysuits are typically more expensive than wetsuits, owing to their superior insulation capabilities and more complex construction. However, for those who like winter paddle boarding, the additional cost of a drysuit could be a worthwhile investment, making drysuits the winner when cold-water protection is the priority.
In the end, the decision between “drysuit vs wetsuit” is heavily influenced by a variety of factors. But fret not, because every wave-rider, diver, or paddle boarder is just one informed choice away from embracing their perfect water escapade.
5. How to Use
While using a drysuit for paddle boarding isn't as complex as diving, it still requires some know-how. Unlike wetsuits, which you just wear and go, drysuits involve managing the air inside them. This is important for comfort and mobility while on the board. Learning to adjust the suit to your needs can make a big difference in your paddle boarding experience.

6. Wetsuit vs Drysuit: What to Wear Underneath
- Wetsuits don’t have much room for extra clothes underneath. Usually, you can only wear a thin shirt called a rash vest. This means wetsuits are not as flexible as drysuits for different temperatures.
- Drysuits keep you warm depending on what you wear under them. In very cold water, like when ice diving in winter, wear thick warm clothes. In summer, you can wear something light and thin. Drysuits are good because you can change what you wear under them for different weather.
7. Changing Gear
If you're switching from a wetsuit to a drysuit for paddle boarding, you may need to consider different gear. For instance, your life jacket may need to be larger to fit over the drysuit. Also, understand how to adjust your buoyancy with the drysuit, as it can be different from what you’re used to with a wetsuit, especially when it comes to maintaining balance and stability on your paddle board.
Deciding Between a Wetsuit and a Drysuit
Decoding the 'wetsuit vs drysuit' quandary is your ticket to enhanced water adventures. Each offers distinct advantages and choices, influenced by water temperature, your intended activity, personal preference, and budget. When these factors align perfectly, you're poised for a water adventure that's not only thrilling but also safe and snug.
Embrace the call of the open waters with iROCKER. Contact us now to ride the best waves together!

We’re all about using creativity to take your SUP investment as far as possible. While every iROCKER board packs plenty of adventure opportunities, it’s always fun to take things to the next level. Get even more out of your board with our versatile SUP to Kayak Conversion Kit.
Test your limits in the ocean or Intracoastal by converting your SUP into a kayak and in less than five minutes you have a completely different piece of equipment and another sport!

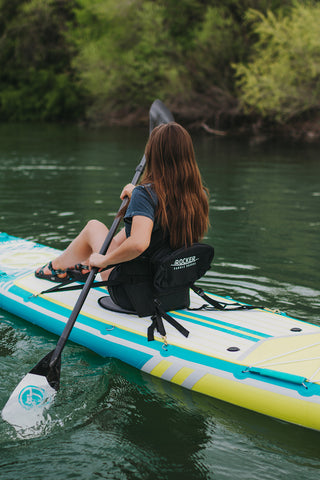
Transforming your SUP into a kayak provides not only a different on-the-water experience, but also offers several benefits. If you’re paddling long distances, having the option to take a break and give your legs a rest means you can adventure further, longer. Having a dual-blade kayak paddle can also be helpful against strong winds or currents. The option to sit down while SUP fishing can also prove beneficial as a seated position can give you more leverage while reeling in your catch—not to mention can be more comfortable if you’re planning a long day of trawling on the water!
Follow this simple advice for your paddle/blade and board and you’ll be kayaking before you know it.
“Even though I primarily like to stand up and paddle, I like the flexibility of being able to use the board as a kayak when my daughter is on board with me. We enjoy using our iROCKER as a kayak more than our actual kayak.”
– Justin N., iROCKER customer
FIVE SIMPLE STEPS TO TURN YOUR IROCKER INFLATABLE PADDLE BOARD INTO A KAYAK
- Step 1: Purchase the Right Kayak Bundle for Your Board Type.
- Step 2: Attach the Seat Straps to the Rings.
- Step 3: Flip the Seat Up and Adjust Straps to Desired Length.
- Step 4: Pull the T-Bar Handle Out of the Paddle.
- Step 5: Replace the T-Bar Handle with the Kayak Blade.
Check out our GWP_1: Kayak Seat + Kayak Blade collection to help turn your iROCKER Inflatable Paddle Board into a Kayak.
Specifically,
Step 1: Purchase the Right Kayak Bundle for Your Board Type
We can’t stress this enough—make sure the kit you purchase is compatible with your SUP package. Our SUP to Kayak Conversion Kit is compatible with all iROCKER boards.
Step 2: Attach the Seat Straps to the Rings
Place the kayak seat facing forward in the middle of your paddle board. Attach the straps on the top of the kayak seat to the D-rings on the front of your board, then attach the straps on the bottom of the kayak seat to the D-rings on the back of your board.
Step 3: Flip the Seat Up and Adjust Straps to Desired Length
Once all the straps are attached correctly, flip open the seat. Adjust the straps accordingly to make sure the seat opens evenly. You may need to take the kayak out for a spin and adjust the straps to fit the posture that’s most comfortable for you.

There you go! Your board is now a kayak. Now it’s time to attach the kayak blade to your SUP paddle.
Step 4: Pull the T-Bar Handle Out of the Paddle
Simply flip the attachment piece on the paddle to remove the original top handle.
Step 5: Replace the T-Bar Handle with the Kayak Blade
Push the kayak blade from your kit into the open end of the paddle. Click the latch down to secure it in place. Now you have a dual-sided paddle perfect for your kayak adventures!
If you’d rather watch—check out this quick how-to video.
That’s all there is to it! The SUP to Kayak Conversion Kit is a great way to save hundreds of dollars on a traditional kayak and a great way to get more out of your SUP. Be sure to take your SUP-Kayak combo on your next trip for endless hours of water fun on your feet or on your bum.

OTHER ISUP ACCESSORIES YOU’LL LOVE
WATERPROOF/BLUETOOTH STEREO ATTACHMENT
If you crave music while you’re on the water, the VIBE Waterproof Speaker is the perfect accessory. Simply use the suction feature to securely attach it to your SUP.
ATTACHABLE COOLER DECK BAG
Gone are the days of relaxing in the middle of the water without a cold drink or snacks in hand. An advanced bungee system attaches the water-resistant Cooler Deck Bag to the D-rings on your board for on-the-go convenience.
ELECTRIC PUMP
Function is the name of the game with the fast-acting iROCKER 12V Electric Pump. Inflate your board to 15 PSI in 12 minutes or less and spend more time on the water.
Explore our BLACKFIN Standard Accessories for BB collection now!

3 Awesome Spots to Paddle Board to Welcome Fall
There’s something special about gliding across crystalline waters on your trusty paddle board on a crisp autumn morning. You drift along the surface of the water and breathe in that fresh, cool air. What could make this moment even better? How about gorgeous snowcapped mountains in the background? Or foliage erupting in the colors of fall?
The summer paddle boarding season may be behind us for 2022, but the fall paddle boarding season is just getting started. And as you kick things off, there are several epic locations around the United States worth visiting. From high mountains to wild forests, here are three destinations that make those fall mornings on the water even better!

The Foliage of Lake Champlain, Vermont
Lake Champlain is big. If you’re from the Northeast, you know this can be an extraordinary place. The lake sits on the border between New York and Vermont, stretching into Canada. With a lake as big as Champlain, you can bet there are plenty of places to set off with your inflatable paddle board. From Burlington to Swanton Beach, the choice is yours. From the middle of September and well into October, the trees explode in fall color throughout Vermont and the rest of New England—and most importantly, all around Lake Champlain. Paddle board in a rural spot around the lake, and you’re sure to be immersed in everything that makes fall so magical.
The Mountains of Jackson Lake, Wyoming
Jackson Lake is due east of the Tetons and off US Route 191 (also known as the John D. Rockefeller Jr. Parkway), so it’s hard to miss. Of course, the view is hard to miss, too. Few paddle boarding locations around the US can match the majesty of Jackson Lake with a pristine view of the Tetons in the background. The great thing about visiting Jackson Lake and Jackson, Wyoming in early fall is the snow has yet to set in. Much of the time, it’s still fairly warm during the day—balanced by those crisp autumn mornings and evenings. When you go out on the lake at sunrise and the light hits the Tetons in golden blazing glory, you might need a moment to catch your breath.

The Serenity of Somes Sound, Maine
Right in the middle of Acadia National Park in Maine, you’ll find Somes Sound. It’s one of the defining features of the park—and it’s perfect for breaking out the inflatable paddleboards. And yes, there’s a reason why a second New England locale is worth mentioning here. During early fall, much like Lake Champlain, the forests of Acadia become a fall foliage wonderland. Not only that, but Acadia National Park—situated on Mount Desert Island—is both fairly remote and mountainous. As you paddle board around Somes Sound and in the various coves that dot the shores of the island, you’re rewarded with spectacular views of color.
About iROCKER
When you need a new paddle board, iROCKER has the perfect option for any excursion. For nearly a decade, they’ve been the go-to source for all things inflatable paddle boarding, offering boards and equipment for all skill levels and interests. Need an inflatable SUP built for stability? iROCKER has it! Need a board made for touring? Find it at iROCKER. Already have a board but need accessories? iROCKER delivers everything you need, including beverage coolers, fishing attachments, waterproof speakers, and much more. As you set out on your next adventure, iROCKER has everything you need. Leave no lake, pond, river, bay, or coastline unexplored, thanks to iROCKER!
Get ready for your fall paddle boarding adventure at irockersup.ca

